


If you are looking at this page without frames, there is more information about medieval writing to be found by going to the home page (framed) or the site map (no frames).
| The Quill Pen | ||||
|
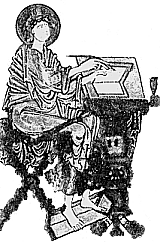
There are many illustrations of scribes in medieval manuscripts and they all convey an image of the simplicity of the scribe's kit. The quill pen was made from easily acquired materials and required only the simplest of equipment, basically a small sharp knife, in its manufacture. The quill and the knife were the all purpose kit for production and maintenance. And while the scribe might have to do regular running repairs, he never got a General Protection Fault. (Gosh, that is practically a medieval reference itself these days. What is it called now - performing an illegal operation?) You can try this at home without creating hazard, but a lot of practice and patience might be needed to get a good result. Simple technology is like that. (See Jackson 1981) | |||
|
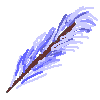
The scribe first selected a feather. It didn't have to be a particularly exotic variety, but a good strong flight feather from the wing of a robust bird worked the best. Medieval re-enactors and people putting on plays please note that there were not many ostriches running around northern Europe in the middle ages. | |||
|
It was usual to cut back the plume of the feather and remove the barb, or feathery bits, from at least the underside of the central barrel of the feather. Despite the loss of romantic affectation, this made it easier to write with and it didn't scrape the scribe's hand. Most pictures of scribes show them holding what looks like a narrow stick rather than something fluffy. | |||
|
The structure of the quill was altered by standing it in hot sand for a period of time. This actually strengthens the barrel of the feather and makes it more flexible and less brittle. After it has slowly cooled the nib can be constructed. | |||
|
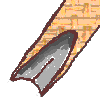
The small sharp knife was then used to make a sloping cut to remove the point of the quill. | |||
|
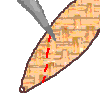
The quill was turned so that the cut away side faced up. The knife was inserted into the hollow of the quill and a slit was made by carefully levering the blade upward. I imagine that this is one of the trickier manoeuvres. | |||
|
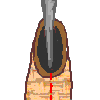
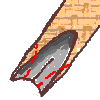
On the opposite side to the slit, a scoop was sliced from the barrel of the quill. | |||
|
The end of the quill now has a sloping aspect with a slit in the end, and is starting to look a bit like a pen. | |||
|
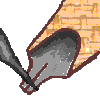
The nib was shaped by cutting away the corners on either side of the slit. | |||
|
The nib was made neat and flat by scraping carefully on the inside. | |||
|
It was sharpened by cutting at an angle from the outside. | |||
|
The nib was then ready for use. As it broke or became worn, it could be resharpened multiple times just using that handy little knife. Calligraphers sometimes derive great satisfaction by examining ancient manuscripts to see how many times the scribe sharpened his quill. It could vary enormously and I guess the amount of work done between sharpenings just depended on having a good feather to start with and on skillful construction of the pen. | |||
| The Quills section of the Regia Anglorum web site demonstrates some techniques for the production of quill pens. Cutting Quill Pens from Feathers gives detailed instructions and photos for doing it yourself in a modern context. A video from English Heritage, which you can see by clicking here, demonstrates the making of a quill pen, and how quickly and easily an expert can do it. The video shown below is nice and clear as well. If you check it out on YouTube by clicking here, you can read the comments which might help solve any problems. This one does have a post-medieval nicety in the form of a brass ink reservoir which makes it into a sort of quill fountain pen, and the guy is using it for drawing, not writing, but the basic technique of cutting the nib is the same. There are other demonstrations on YouTube, but some of them are a little strange. | ||||
|
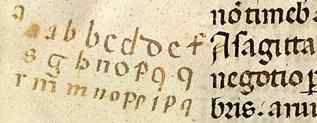
Alphabet letters written in the margin of 15th century Italian missal, from a private collection. | |||
| When a scribe had recut or replaced a nib, it had to be tested and written in. They might use scraps of parchment for this, but sometimes the process is found in curiously inappropriate places. Writing out the letters of the alphabet ensured that the pen was working for all the different strokes. The example above is doodled into the blank margin of an otherwise elegantly written missal. | ||||
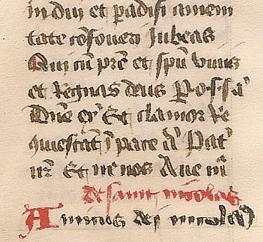
| The quill pen was a fragile and imperfect instrument, and sometimes failed on the job. In the example at right, you can see how the writing deteriorates over several lines, becoming scratchy and messy as the scribe has some kind of pen issue. Vellum being the expensive stuff that it was, the page was not discarded. I guess the hapless scribe just had to tidy up his pen and soldier on. | |
|||
| Segment of a page from a 15th century book of hours, from a private collection. | ||||
| The quill pen was used right through the medieval era and far beyond, only being replaced eventually by the steel nibbed pen. This was much stronger and allowed for for extravagant flourishes which became a feature of post-medieval calligraphy. The basic design of the split nib continued through into that icon of the 1950s and 1960s, the fountain pen, which was the professional man's ultimate status tool. It was before the days of mobile phones and personal organisers. I have to admit to having learned to write in primary school with a steel nibbed pen, those nasty newfangled ballpoints being considered the work of the devil and the death of proper writing, and we were taught to do light upstrokes and heavier downstrokes just like medieval scribes, to produce the distinctive character of the lettering of the split nib pen. | ||||
|
|
||||
|
If you are looking at this page without frames, there is more information about medieval writing to be found by going to the home page (framed) or the site map (no frames). |
||||